MIG Settings by Thickness (MIG Settings Chart & Tuning Guide)
Getting MIG (GMAW) settings right begins with metal thickness. Thickness determines the transfer mode you can use, the wire size you should load, the gas you should choose, and—ultimately—the voltage and wire feed speed (WFS) that give sound fusion without distortion or defects. This guide provides thickness-based charts for mild steel, stainless steel, and aluminum, followed by a practical tuning workflow to lock in clean, repeatable results.
Important: The numbers below are starting points. Your exact settings will vary with machine brand, actual gas composition, CTWD (stickout), joint geometry, and position. Always run test coupons and tune.
Why Thickness-Based Settings Matter
Metal thickness governs how quickly heat is wicked away from the puddle and how much energy you must deliver for full fusion. On thin sheet, you want controlled heat input to avoid burn-through and distortion; on thick plate, you want higher deposition and deeper penetration, which pushes you toward spray or pulsed transfer and larger wire diameters.
Heat input, fusion, and distortion
Heat input is primarily a function of amperage, voltage, and travel speed. For a given wire size and transfer mode, WFS correlates strongly to amperage, while voltage governs arc length and wetting. Too little energy yields lack of fusion and cold lap; too much overheats the HAZ, causing distortion or burn-through.
Transfer modes and their operating windows
Short-circuit (SC): Lower volts/amps; good for thin materials, out-of-position work, and gap-tolerant roots. More spatter, less penetration.
Globular: Transitional and generally avoided due to spatter and instability.
Spray: High deposition, smooth arc, deep fusion; prefers flatter positions and argon-rich mixes; needs enough volts/amps to cross the spray threshold.
Pulsed spray: Narrows the heat-input window of spray so you can use it on thinner sections and out-of-position with better control.

How to Use This Guide
Step-by-step workflow for dialing in settings
Pick your transfer mode based on thickness and position.
Select wire diameter appropriate to thickness (see table below).
Choose a shielding gas compatible with the mode/material.
Start with the chart values for voltage and WFS.
Set stickout (CTWD): ~3/8–1/2 in (10–12 mm) for SC; ~3/4 in (18–20 mm) for spray/pulsed unless manufacturer says otherwise.
Run a test coupon in the same joint and position, then tune voltage (arc length/wetting) and WFS (fusion/deposition).
Verify penetration by macro-etch or cut-and-bend when quality matters.
Safety, test coupons, and verification
Use proper PPE, verify gas flow (typically 20–30 CFH / 10–14 L/min for SC; 30–40 CFH / 14–19 L/min for spray with larger nozzles), and clean the joint to bright metal—especially for aluminum and stainless.
Quick MIG Settings Chart — Mild Steel (ER70S-6)
The table below gives starter settings for common thicknesses. For short-circuit, 75/25 Ar/CO₂ is assumed unless noted. For spray, use 90/10 or 92/8 Ar/CO₂ (or 95/5) to cross the spray threshold cleanly.
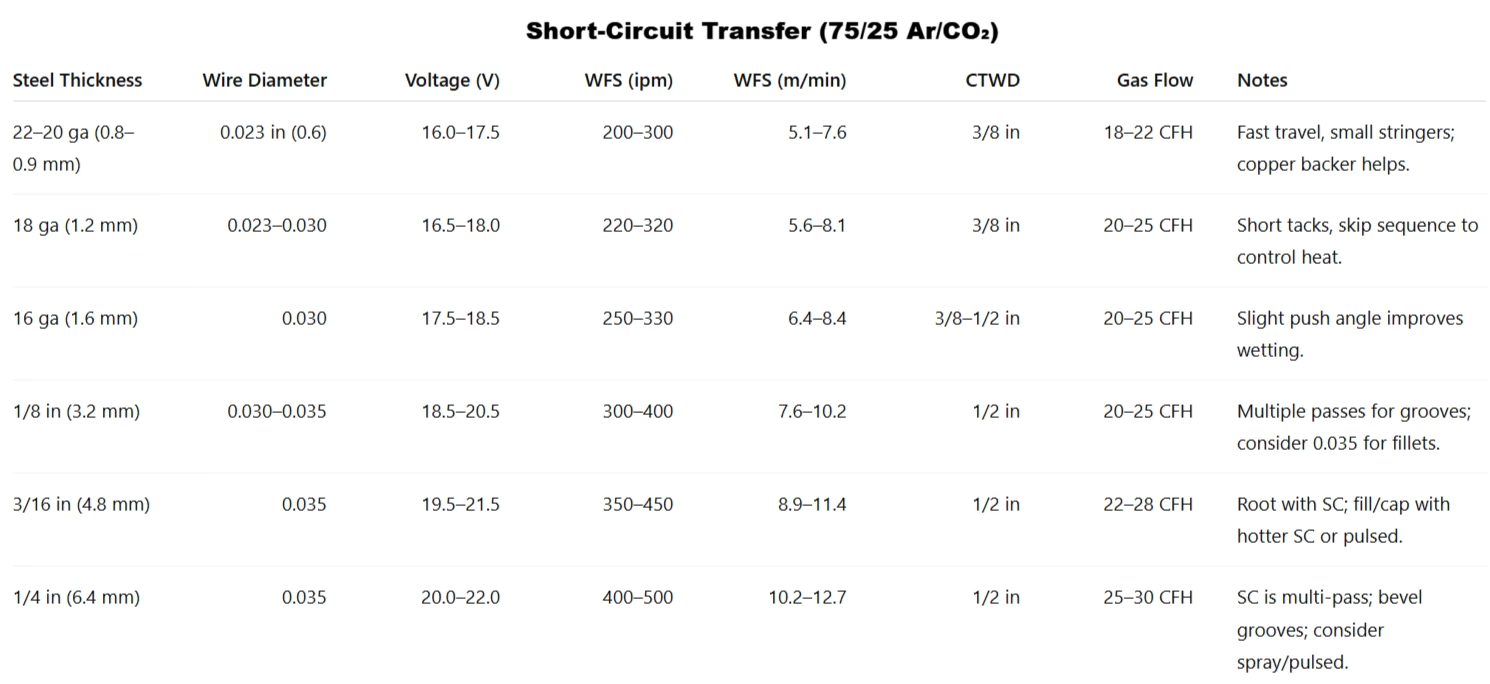
Tip: With 100% CO₂, expect higher penetration but more spatter. Start ~0.5–1.0 V lower than with 75/25 and tune.
Spray/Pulsed Transfer (90/10, 92/8, or 95/5 Ar/CO₂)
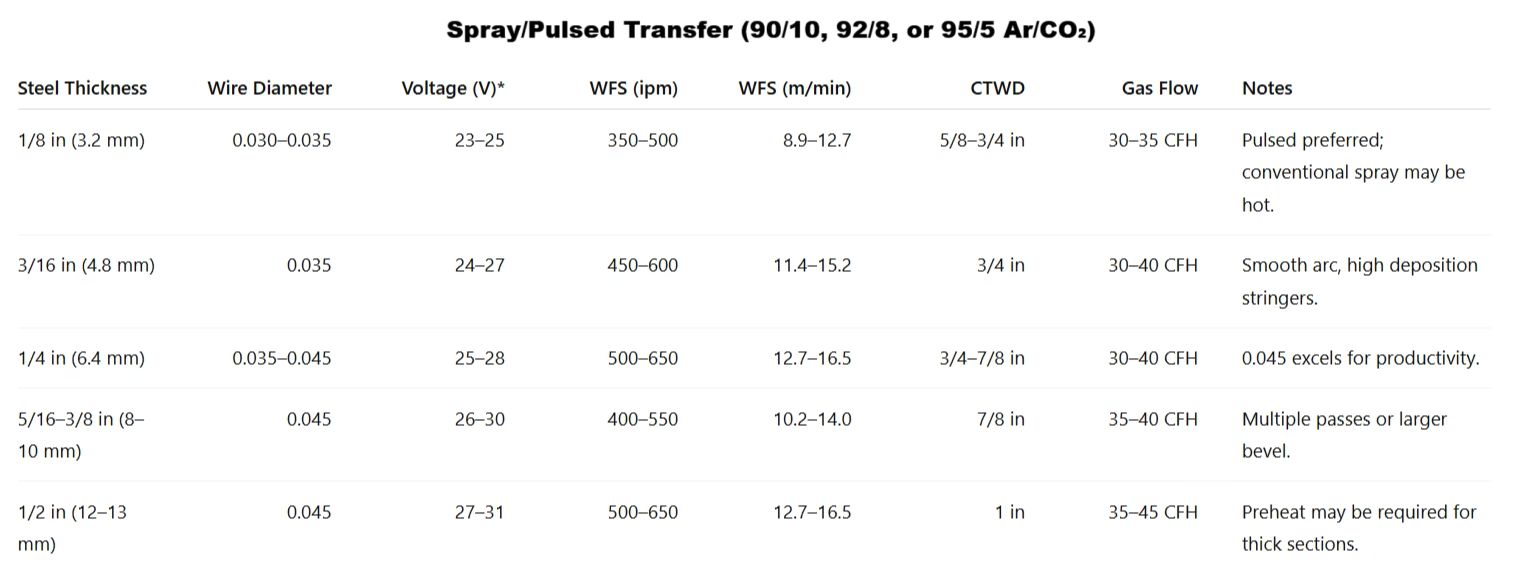
* Pulsed machines show peak/base values, not just a single “voltage.” Use manufacturer’s “material/thickness” presets as a baseline.
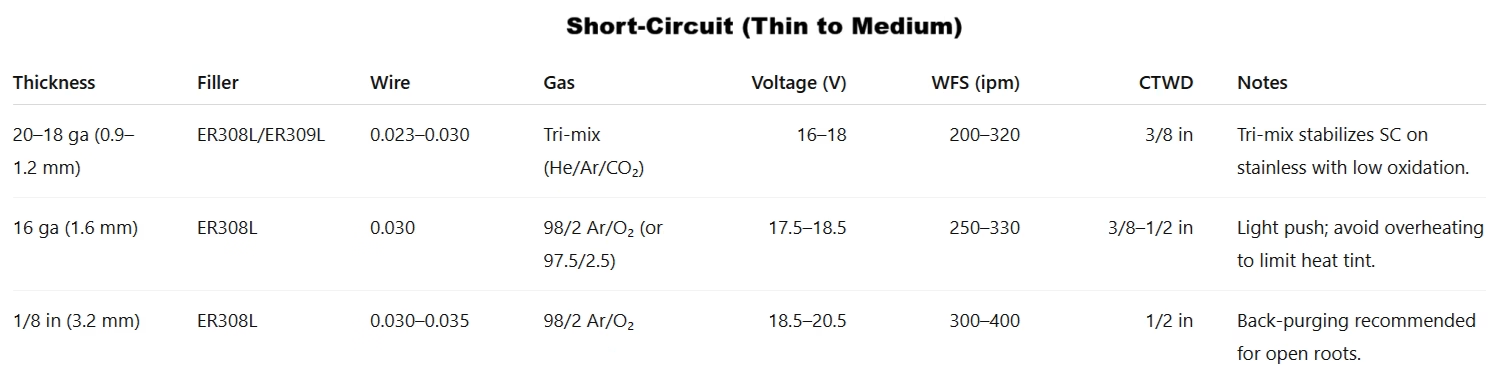
Quick MIG Settings Chart — Stainless Steel
Stainless is less forgiving about heat tint and oxidation. Keep interpass temps lower, use clean wire and liners, and consider backing gas for full-pen grooves.
Short-Circuit (Thin to Medium)
Spray/Pulsed (Preferred for ≥3 mm)

Quick MIG Settings Chart — Aluminum (ER4043 / ER5356)
Aluminum conducts heat rapidly and forms an oxide with a higher melting point than the base metal. Clean mechanically and with a dedicated stainless brush; use 100% argon for most work (Ar/He blends for very thick sections). A spool gun or push-pull system helps maintain consistent feed.
Short-Circuit (Limited; very thin sheet)

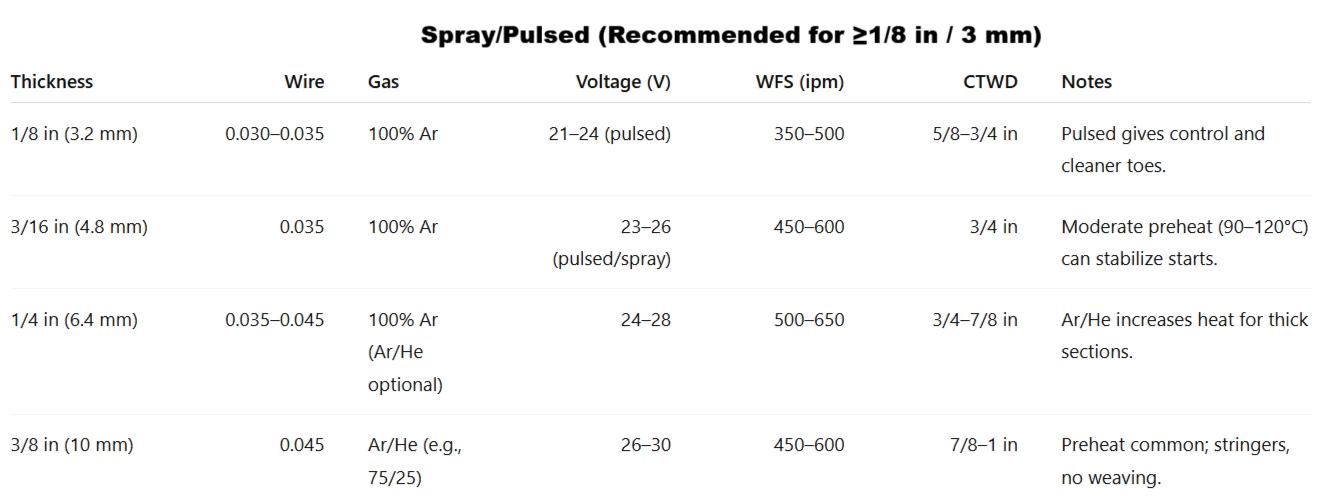
Spray/Pulsed (Recommended for ≥1/8 in / 3 mm)
Choosing Wire Diameter by Material Thickness
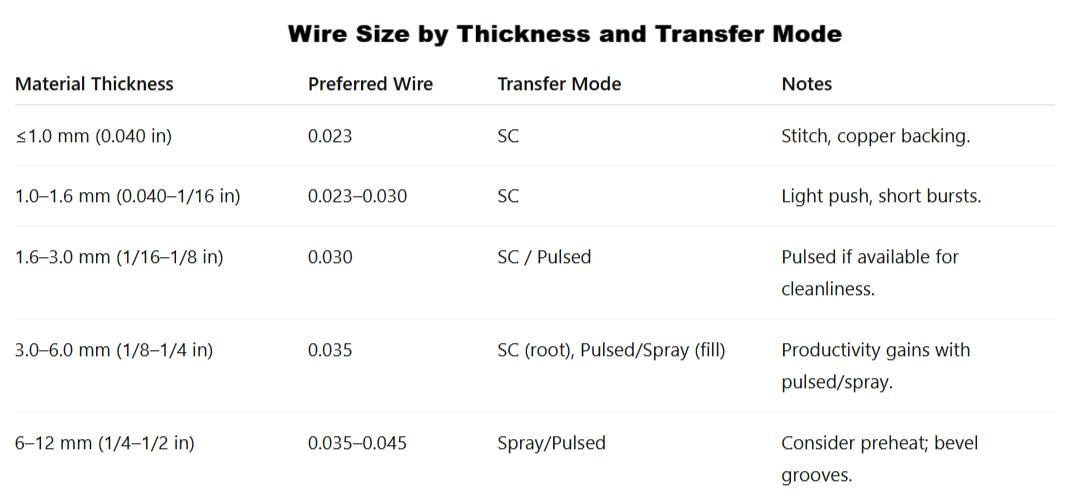
0.023–0.030 in (0.6–0.8 mm): Best for thin sheet (≤1.6 mm / 1/16 in). It allows lower current at usable feed speeds, keeping heat input under control.
0.035 in (0.9 mm): The all-rounder for 1/8–1/4 in (3–6 mm). It supports both short-circuit (roots, out-of-position) and pulsed/spray (production fillets and fills).
0.045 in (1.1 mm): For 3/16–1/2 in (5–12 mm) where spray/pulsed deposition and deeper fusion are needed.
Practical note: If you constantly max your WFS to keep up on a job, move up a wire size; if you can’t get cool enough without stubbing, move down.
Gas Selection by Material and Transfer Mode
Mild steel: 75/25 vs 90/10 (and CO₂)
75/25 Ar/CO₂: Ideal for short-circuit—stable arc, low spatter, good wetting on fillets.
90/10, 92/8, or 95/5 Ar/CO₂: More argon enables spray. Cleaner arc, higher deposition.
100% CO₂: Hotter, deeper penetration, but more spatter and harsher arc—popular for structural SC roots when cleanup is acceptable.
Stainless: tri-mix vs lean active
Tri-mix (He/Ar/CO₂): Stabilizes short-circuit on thin stainless with less oxidation and better puddle control.
98/2 Ar/O₂ (or 98/2 Ar/CO₂): Excellent for spray/pulsed with stainless; oxygen promotes wetting at low percentages.
Aluminum: 100% Ar, Ar/He blends
100% Argon: The default for most aluminum MIG.
Argon/Helium (e.g., 75/25): Adds heat for thick sections and faster travel, at higher gas cost.
Tuning Voltage, Wire Feed Speed, and Inductance
What to adjust first—and why
Start with WFS to set amperage and puddle size. If fusion is weak and the bead sits “cold,” increase WFS.
Adjust voltage to control arc length and wetting. Too low = harsh, stubbing arc; too high = flat, wide bead with undercut risk.
Inductance (on some machines): Higher inductance softens short-circuit, increasing wetting and reducing spatter; lower inductance sharpens the arc for crisp tie-in.
Reading bead shape, sound, and arc behavior
Short-circuit sound: A steady, bacon-sizzle indicates a tuned SC arc. Loud popping = too low voltage or excessive stickout; angry roar = too high voltage.
Bead indicators:
High crown, narrow bead = low voltage or low WFS.
Wide, flat bead with undercut = high voltage or travel too fast.
Cold lap (rolled toes) = WFS too low or travel too slow.
Stickout and contact-tip-to-work distance (CTWD)
Stickout acts like a resistor. Longer stickout reduces current at the same WFS; shorter raises it. Maintain ~10–12 mm (3/8–1/2 in) for SC and ~18–25 mm (3/4–1 in) for spray/pulsed unless your gun/manufacturer specifies otherwise. Re-tune voltage/WFS if CTWD changes.
Joint Type, Position, and Preparation
Fillet vs groove welds and beveling
Fillets on thin/medium material weld well with SC or pulsed using stringers.
Grooves over ~1/8 in (3 mm) benefit from bevels (30–37.5° total) and a small root gap to ensure penetration. Root with SC/pulsed, fill and cap hotter.
Flat vs out-of-position settings
Flat/Horizontal: Best for spray/pulsed with higher deposition.
Vertical/Overhead: Prefer SC or pulsed with lower heat input. Reduce voltage slightly, keep WFS for fusion, use uphill technique for vertical fillets.
Fit-up, gaps, and root faces
Consistent gaps and root faces stabilize the puddle and penetration. For thin sheet, tight fit-up with copper backing helps prevent burn-through. For thicker grooves, a controlled root gap (1/16–1/8 in) promotes fusion at the root.
Metric/Imperial Quick Conversions
WFS:
ipm × 0.0254 = m/min(e.g., 400 ipm ≈ 10.2 m/min).Stickout:
in × 25.4 = mm(e.g., 3/4 in ≈ 19 mm).Plate thickness:
in × 25.4 = mm.
Starter presets (mild steel, ER70S-6, 75/25, flat fillets):
1/16 in (1.6 mm): ~17.5 V, 280 ipm, 0.030 wire, CTWD 10 mm.
1/8 in (3.2 mm): ~19.5 V, 340 ipm, 0.035 wire, CTWD 12 mm.
1/4 in (6.4 mm, spray): ~26 V, 0.035 wire at 550 ipm, CTWD 19 mm, 90/10 gas.
Final Checks, Test Plans, and Documentation
Welder’s log, heat input notes, and repeatability
Record wire size, gas, voltage, WFS, CTWD, travel angle, position, and observed bead shape for each job. Photograph macro-etches of procedure trials. A simple log builds repeatability across different machines and shops.
When to move from short-circuit to pulsed/spray
Switch when material thickness or productivity demands exceed SC’s stable window—typically around 3/16–1/4 in (5–6 mm) in flat/horizontal fillets or when you need cleaner, higher-deposition beads with less spatter.
At-a-Glance: Wire Size by Thickness and Transfer Mode
FAQs
What’s the fastest way to get in the ballpark for a new thickness?
Start with the chart values for your material and wire size, set CTWD correctly, run a test bead, and adjust WFS first (for fusion/deposition) and voltage second (for wetting/arc length). Small changes—then recheck.
When should I switch from 75/25 to a spray-capable gas?
When you reach ~3/16–1/4 in (5–6 mm) in flat/horizontal work and need higher deposition with less spatter. Use 90/10, 92/8, or 95/5 Ar/CO₂ (or pulsed) to cross into spray.
How do I stop burn-through on thin sheet?
Use 0.023–0.030 wire, short-circuit transfer, low voltage, short stickout, and stitch/skip welding with a copper backer. Keep travel brisk and minimize heat buildup.
Why does my bead look wide and undercut at the toes?
Voltage is likely too high or travel speed too fast. Reduce voltage slightly, shorten stickout to recover amperage, and keep a modest push angle for better wetting.
Do I need different gas for stainless and aluminum?
Yes. Stainless often benefits from tri-mix for short-circuit and 98/2 Ar/O₂ (or similar) for spray/pulsed. Aluminum requires 100% argon for most work, with Ar/He blends on thick sections to add heat.
Conclusion
Thickness is the compass for MIG settings. Choose a transfer mode and wire size matched to the section, select a compatible shielding gas, and then set WFS for amperage and voltage for wetting. Control stickout rigorously, read the bead, and tune in small, deliberate steps. Use short-circuit for thin sheet and positional control; move to pulsed or spray when thickness or productivity demands it. With the thickness-based charts in this guide and a disciplined test-coupon routine, you can land on clean, sound settings quickly—and repeat them confidently.