Types of Welding Positions
Introduction
Welding is a crucial process in many industries, including manufacturing, construction, and engineering. It involves joining two or more pieces of metal using high heat and pressure, resulting in a strong and durable bond. However, welding is not a one-size-fits-all process, as there are different types of welds and welding positions that are required for different projects.
Welding positions refer to the different angles and directions in which a welder must weld to join two pieces of metal. The most common welding positions are 1G, 2G, 3G, 4G, 5G, and 6G, each with its own unique characteristics and challenges. Understanding these positions and their importance is crucial for achieving high-quality welds and ensuring the durability of the finished product.
Types of Welding Positions

Welding positions refer to the orientation of the workpiece being welded and the direction in which the welding is performed. There are several types of welding positions, including:
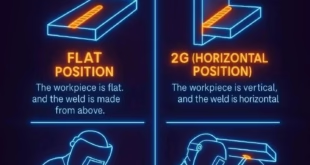
Flat position (1F, 1G)
The workpiece is horizontal, and the welding is performed from above. The 1F position is used for fillet welds, while the 1G position is used for groove welds.
Horizontal position (2F, 2G)
The workpiece is positioned horizontally, and the welding is performed from the side. The 2F position is used for fillet welds, while the 2G position is used for groove welds.
Vertical position (3F, 3G)
The workpiece is positioned vertically, and the welding is performed from top to bottom. The 3F position is used for fillet welds, while the 3G position is used for groove welds.
Overhead position (4F, 4G)
The workpiece is positioned overhead, and the welding is performed from below. The 4F position is used for fillet welds, while the 4G position is used for groove welds.
Inclined position (5G)
The workpiece is positioned at an angle, and the welding is performed in the horizontal direction. This position is used for pipe welding.
Circular position (6G)
The workpiece is rotated while the welding is performed in the horizontal, vertical, and overhead positions. This position is also used for pipe welding.

Importance of Welding Positions
The importance of welding positions lies in the fact that the orientation of the workpiece being welded and the direction in which the welding is performed can greatly affect the quality and strength of the weld. The choice of welding position depends on several factors, such as the type of joint being welded, the thickness and shape of the workpiece, and the type of welding process being used.
Here are some reasons why welding positions are important:
- Quality and strength of the weld: The orientation of the workpiece and the direction of welding can affect the penetration, fusion, and reinforcement of the weld. Welding in the wrong position or direction can result in poor quality, weak welds that are prone to cracking, porosity, or incomplete fusion.
- Safety: Welding positions can affect the safety of the welder and others in the vicinity. For example, welding in the overhead position can expose the welder to hazards such as falling debris, sparks, and fumes. Welding in the correct position can ensure that the welder has a clear line of sight and access to the joint, and can avoid unnecessary contortions or awkward postures that can cause strain or injury.
- Efficiency and productivity: Choosing the right welding position can increase efficiency and productivity by reducing the need for repositioning or reworking the workpiece. Welding in the optimal position can also reduce the amount of filler metal, time, and energy required to complete the weld.
- Code and standard compliance: Many welding codes and standards specify the type of welding position that is required for certain types of joints and applications. Failure to follow these requirements can result in noncompliance, rejection, or safety hazards.
Preparing for Welding Positions
Preparing for welding positions involves several steps to ensure that the workpiece is properly positioned, aligned, and supported for welding. Here are some tips on how to prepare for different welding positions:
- Flat position (1F, 1G): The workpiece should be placed horizontally on a stable surface or a workbench. The joint should be properly aligned and secured to prevent movement during welding. The welder should position themselves above the joint and maintain a comfortable working position that allows for good visibility and control.
- Horizontal position (2F, 2G): The workpiece should be positioned horizontally, and the joint should be oriented perpendicular to the ground. The joint should be properly aligned and supported to prevent sagging or distortion during welding. The welder should position themselves to the side of the joint and maintain a comfortable working position that allows for good visibility and control.
- Vertical position (3F, 3G): The workpiece should be positioned vertically, and the joint should be oriented perpendicular to the ground. The joint should be properly aligned and supported to prevent sagging or distortion during welding. The welder should position themselves in front of the joint and maintain a comfortable working position that allows for good visibility and control. The use of a backing strip or backer plate may be necessary to support the root of the weld.
- Overhead position (4F, 4G): The workpiece should be positioned overhead, and the joint should be oriented perpendicular to the ground. The joint should be properly aligned and supported to prevent sagging or distortion during welding. The welder should position themselves below the joint and maintain a comfortable working position that allows for good visibility and control. The use of a welding helmet or shield can protect the welder from falling debris or sparks.
- Inclined position (5G): The workpiece should be positioned at an angle, and the joint should be properly aligned and supported to prevent sagging or distortion during welding. The welder should position themselves to the side of the joint and maintain a comfortable working position that allows for good visibility and control. The use of a pipe stand or vise can help to hold the workpiece in place.
- Circular position (6G): The workpiece should be securely mounted on a pipe stand or rotator, and the joint should be properly aligned and supported to prevent sagging or distortion during welding. The welder should position themselves to the side of the joint and maintain a comfortable working position that allows for good visibility and control. The use of a welding helmet or shield can protect the welder from falling debris or sparks.
Best Practices for Welding Positions
Adhering to best practices for welding positions can improve the quality and safety of the weld, as well as increase efficiency and productivity. Here are some tips on how to follow best practices for different welding positions:
Flat position (1F, 1G)
- Ensure that the workpiece is properly cleaned, free from contaminants, and properly positioned and secured.
- Choose the correct welding technique for the joint and workpiece, such as a drag technique for fillet welds and a push technique for groove welds.
- Maintain a consistent travel speed and maintain a constant arc length to ensure proper penetration and fusion.
- Use a backing strip or backer plate to support the root of the weld.
Horizontal position (2F,2G)
- Use a sturdy workbench or support stand to prevent the workpiece from sagging or moving during welding.
- Use a weaving technique to ensure even distribution of weld metal and to prevent undercutting.
- Ensure that the weld pool is properly directed and not excessive to avoid drooping or sagging of the weld.
Vertical position (3F, 3G)
- Use a jig or clamping device to hold the workpiece in place and maintain proper alignment and position.
- Use a weaving or oscillation technique to ensure even distribution of weld metal and to prevent undercutting.
- Ensure that the weld pool is properly directed and not excessive to avoid drips or spatter.
Overhead position (4F, 4G)
- Use a sturdy support stand or rigging to hold the workpiece in place and prevent sagging or movement during welding.
- Use a short arc technique to minimize the size of the weld pool and avoid excessive spatter.
- Use a weaving or oscillation technique to ensure even distribution of weld metal and to prevent undercutting.
Inclined position (5G)
- Use a pipe stand or vise to hold the workpiece in place and prevent sagging or movement during welding.
- Use a weaving or oscillation technique to ensure even distribution of weld metal and to prevent undercutting.
- Adjust the angle and direction of the weld to ensure proper penetration and fusion.
Circular position (6G)
- Use a sturdy pipe stand or rotator to hold the workpiece in place and ensure proper rotation speed and direction.
- Use a weaving or oscillation technique to ensure even distribution of weld metal and to prevent undercutting.
- Adjust the angle and direction of the weld to ensure proper penetration and fusion.
Certification for Welding Positions
Certification for welding positions is important to ensure that a welder has the knowledge, skills, and expertise to perform welding work safely and effectively. Certification involves testing a welder’s abilities to perform welding work in specific positions, with specific materials, and using specific techniques. Here’s a detailed look at certification for welding positions:
- Certification Bodies: Certification for welding positions is usually conducted by third-party organizations that specialize in welding certifications. These organizations include the American Welding Society (AWS), the Canadian Welding Bureau (CWB), and the European Welding Federation (EWF), among others. These organizations set the standards for welding certification and provide testing and certification services.
- Welding Processes and Positions: Certification for welding positions covers a range of welding processes, including shielded metal arc welding (SMAW), gas tungsten arc welding (GTAW), gas metal arc welding (GMAW), and flux-cored arc welding (FCAW). Certification for welding positions also covers a range of welding positions, including flat, horizontal, vertical, overhead, inclined, and circular.
- Testing Process: The testing process for welding certification involves both written and practical tests. The written test covers topics such as welding theory, safety, and welding symbols. The practical test involves welding a test coupon to demonstrate proficiency in a specific welding position and using a specific welding process.
- Welding Test Coupon: The welding test coupon is a sample piece of material that is used for the practical test. The test coupon is prepared according to specific requirements for the welding position and process being tested. The welder is required to produce a weld that meets specific criteria, including proper penetration, fusion, and appearance.
- Certification Levels: Welding certification is available at different levels, depending on the complexity of the welding work being performed. The most common certification levels are:
- Entry-level or beginner certification: This certification is for welders who are new to the profession and have limited experience.
- Advanced or journeyman certification: This certification is for experienced welders who have mastered multiple welding positions and processes.
- Expert or master certification: This certification is for welders who have achieved a high level of expertise and proficiency in multiple welding positions and processes.
- Certification Renewal: Welding certification is typically valid for a certain period, usually between one and three years. Welders must renew their certification before it expires by passing a recertification test or by taking continuing education courses.
Choosing the Right Welding Position
- Joint Design: The joint design is an important consideration when choosing the right welding position. The joint design determines the amount of access that the welder has to the joint and the orientation of the joint relative to the welder. The joint design can be either a butt joint, lap joint, corner joint, or T-joint, each requiring different welding positions.
- Material Thickness: The thickness of the material being welded is another important consideration. Thicker materials may require a different welding position than thinner materials. For example, vertical welding may be more suitable for thicker materials, while horizontal welding may be better for thinner materials.
- Welding Process: The welding process being used is also a key factor in determining the appropriate welding position. Different welding processes require different welding positions to achieve the best results. For example, shielded metal arc welding (SMAW) is typically used for flat and horizontal welding positions, while gas tungsten arc welding (GTAW) is commonly used for vertical and overhead welding positions.
- Accessibility: The accessibility of the weld joint is also a factor in determining the appropriate welding position. Some weld joints may be difficult to access, requiring a specific welding position to achieve the desired results. For example, an overhead welding position may be necessary for a joint located on the ceiling.
- Welder Skill Level: The skill level of the welder is also an important factor to consider when choosing the right welding position. A beginner welder may find it challenging to perform certain welding positions, while an experienced welder may be comfortable with more challenging positions.
- Safety: Safety is always a critical consideration in welding. Choosing the right welding position ensures that the welder can perform the work safely and without any unnecessary risks. For example, welding in an overhead position may require additional safety measures, such as using a harness or securing the workpiece.
Troubleshooting Welding Issues
Welding is a complex process that requires skill, knowledge, and attention to detail. Even experienced welders may encounter issues that affect the quality of their work. When welding issues arise, it’s important to troubleshoot the problem quickly and effectively. Here are some common welding issues and how to troubleshoot them:
- Porosity: Porosity occurs when gas bubbles become trapped in the weld metal. This can weaken the weld and reduce its overall strength. To troubleshoot porosity, check the welding parameters, such as the voltage, amperage, and gas flow rate, to ensure they are set correctly. Check the gas supply and make sure it is clean and dry. Also, ensure that the joint is properly cleaned and free from contaminants.
- Lack of Fusion: Lack of fusion occurs when the weld metal does not fuse with the base metal, resulting in a weak weld. To troubleshoot lack of fusion, check the welding parameters to ensure they are set correctly. Also, make sure the joint is properly prepared and that the surfaces to be welded are clean and free from contaminants. Increase the travel speed, and adjust the angle and distance of the torch or electrode to the joint.
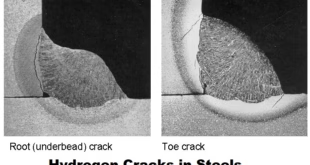
- Cracking: Cracking occurs when the weld metal or base metal cracks due to high stresses or improper cooling. To troubleshoot cracking, ensure that the welding parameters are set correctly and that the joint is properly prepared. Increase the preheat temperature to reduce thermal stresses and allow the weld to cool slowly. Also, avoid excessive welding speeds and use a lower amperage or voltage to reduce heat input.
- Undercutting: Undercutting occurs when the base metal near the weld pool is melted away, resulting in a groove. To troubleshoot undercutting, ensure that the welding parameters are set correctly and that the joint is properly prepared. Reduce the welding speed and increase the travel angle to fill the groove. Also, avoid excessive amperage or voltage, which can increase the heat input.
- Overlapping: Overlapping occurs when the weld metal overlaps with the previously deposited weld metal, resulting in a weak weld. To troubleshoot overlapping, reduce the amperage or voltage to decrease the heat input. Also, increase the travel speed and adjust the angle and distance of the torch or electrode to the joint. Ensure that the weld bead is not too wide and that the weld is properly cleaned and free from contaminants.
- Spatter: Spatter occurs when small droplets of molten metal are scattered around the weld, causing a mess and potentially contaminating the workpiece. To troubleshoot spatter, check the welding parameters to ensure they are set correctly. Use a high-quality welding wire or electrode, and ensure that the joint is properly prepared and free from contaminants. Also, ensure that the wire or electrode is properly positioned and that the shielding gas is properly flowing.
FAQs
What do 1F 2F 3F and 4F mean in welding?
What are the 6 welding positions?
The 6 welding positions are:
- Flat (1F, 2F, 3F, 4F)
- Horizontal (1G, 2G)
- Vertical (3G, 4G)
- Overhead (1G, 2G)
What is 5G 6G welding position?
5G and 6G welding positions are used for pipe welding. 5G is a horizontal fixed position, while 6G is a pipe joint that is at a 45-degree angle and requires the welder to rotate the pipe as they weld.
What is 4F welding position?
4F is an overhead butt joint welding position where the welder is welding from below the joint.
What is a 6G weld?
A 6G weld is a weld on a pipe joint that is at a 45-degree angle and requires the welder to rotate the pipe as they weld.
What is a 2G weld test?
A 2G weld test is a welding certification test where the welder is required to perform a horizontal butt joint weld.
What is 1G 2G 3G 4G 5G 6G welding?
1G, 2G, 3G, 4G, 5G, and 6G welding refer to the various welding positions used in welding different types of joints.
What is 5F in welding?
5F in welding refers to a horizontal fillet weld.
What welding position is 3G?
3G is a vertical up welding position where the weld is performed on the outside corner of two pieces of metal.
Conclusion
In conclusion, welding is a crucial process in the manufacturing and construction industries. The quality of welds directly impacts the strength, durability, and safety of structures and components. Welding positions play a crucial role in determining the quality and strength of welds. Therefore, choosing the right welding position and preparing for it correctly are essential for successful welding operations. Best practices for welding positions include selecting the correct welding technique, monitoring and adjusting welding parameters, and ensuring proper joint preparation and cleanliness. Additionally, welders should obtain certification for the specific welding position they will be working on to ensure they have the necessary skills and knowledge to perform the job safely and effectively. Lastly, troubleshooting welding issues is crucial for ensuring high-quality welds. By understanding common welding issues and their causes, welders can quickly identify and resolve problems, ensuring safe and effective welds.