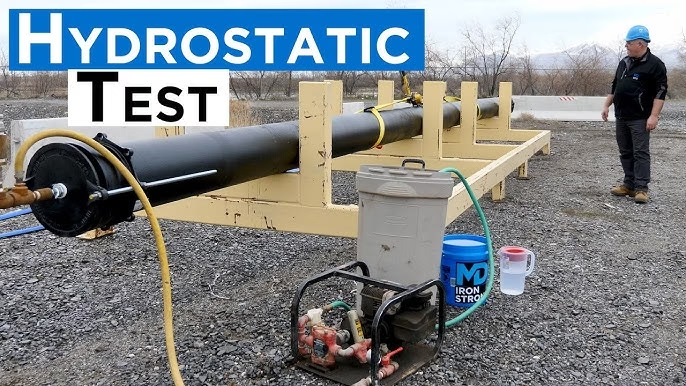
Hydrostatic Testing of Fabricated Piping
What Is Hydrostatic Testing?
Hydrostatic testing is a non-destructive pressure test used to verify the strength and leak-tightness of fabricated piping systems. The procedure involves filling the piping with a liquid—most commonly water—pressurizing it to a value above the design pressure, and observing it for a specified duration to detect any leakage or pressure drop.
This method mimics the internal pressure stresses the system will experience during actual operation, ensuring that all joints, welds, fittings, and components can withstand operational loads before the system goes live.
Why Is It Essential in Fabricated Piping?
Hydrostatic testing acts as a final assurance before a system is handed over for commissioning. In fabricated piping—where components are welded, flanged, or otherwise joined—the risk of undetected flaws like incomplete weld penetration, porosity, or cracks is always present. This test provides peace of mind, confirms system reliability, and helps ensure regulatory compliance.
Purpose and Objectives of Hydrostatic Testing
Verification of Integrity
Hydrostatic testing validates the structural integrity of the fabricated piping. If the pipe can withstand the test pressure without leaking or deforming, it’s considered safe for operation.
Ensuring Safety and Reliability
A leak or rupture in a pressurized system can have catastrophic consequences. By performing a hydrostatic test, potential failures can be identified and corrected before the system is pressurized with hazardous or expensive fluids.
Regulatory and Code Compliance
Testing is not optional—it is a requirement in nearly all pressure piping codes. Codes like ASME B31.3, B31.1, and API specify the conditions under which testing must be done and what criteria must be met.
Relevant Codes and Standards
ASME B31.3 – Process Piping
ASME B31.3 governs the design and testing of piping systems in industries like oil and gas, petrochemical, and chemical processing. It outlines the procedures, pressure limits, and documentation needed for hydrostatic testing.
ASME Section VIII Div 1 – Pressure Vessels
For pipework associated with pressure vessels, this code applies. It includes guidelines for allowable stress, design pressure, and testing standards.
API Standards and Other Applicable Codes
The American Petroleum Institute (API) provides additional standards—such as API 570 and API 650—that address in-service inspection and tank piping testing. National, regional, and customer-specific codes may also apply.
Pre-Test Preparations
Inspection and Cleaning of Piping System
Before testing, the piping must be thoroughly inspected and cleaned. Debris, welding slag, rust, and oil residues can compromise test accuracy or even damage test equipment.
Temporary Test Equipment Installation
Test blinds, pressure gauges, vents, and fill/drain connections must be securely installed. All temporary closures should withstand the full test pressure without leaking or deforming.
Calibration of Instruments
All pressure gauges and instruments used during testing must be calibrated, preferably within six months of the test date. A gauge with a range of 1.5 to 4 times the test pressure is typically recommended.
Review of Test Plan and Documentation
A detailed hydrostatic test plan should be developed and approved. It includes the test pressure, duration, method of pressurization, hold time, inspection protocol, and safety measures.
Test Medium Selection and Safety Considerations
Why Water Is Typically Used
Water is almost incompressible, making it ideal for hydrostatic testing. In the event of a rupture, water releases energy slowly compared to compressed gases, making it much safer.
Temperature and Pressure Conditions
The test fluid temperature should be above freezing and not so hot that it causes expansion-related errors. ASME B31.3 recommends maintaining test fluid temperature between 16°C and 52°C.
Chemical Additives and Corrosion Inhibitors
Corrosion inhibitors may be added to the water to prevent rusting, especially in carbon steel systems. For systems handling sensitive materials, deionized or treated water may be used.
Safety Protocols and Risk Assessment
Barriers, signage, safety clothing, and evacuation plans should be in place before testing begins. Hydrostatic tests involve high pressures that can cause injury or equipment damage if not handled properly.
Test Pressure Determination
Factors Affecting Test Pressure
The test pressure is influenced by the design pressure, material stress limits, and code requirements. It must be high enough to stress the system but not so high as to cause damage.
Code-Based Calculations (ASME B31.3)
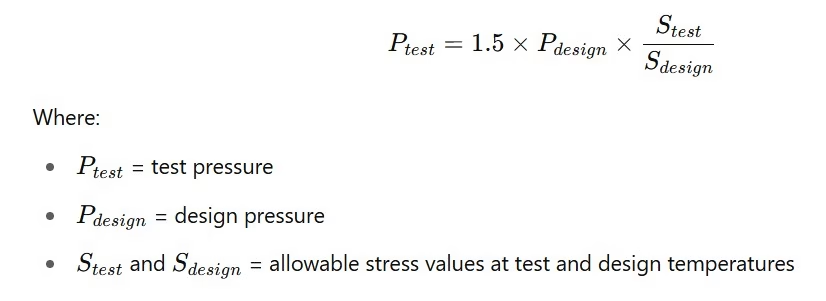
As per ASME B31.3, the hydrostatic test pressure is calculated using the formula:
Typical Pressure Values and Margins
The minimum test pressure is generally 1.5 times the design pressure unless otherwise specified. Some owners may require higher margins for critical systems.
Conducting the Hydrostatic Test
Step-by-Step Procedure
Fill the system completely with the test medium.
Remove all air through vents at high points.
Pressurize gradually to 25%, then 50%, 75%, and finally the full test pressure.
Maintain the pressure and inspect visually.
Monitoring and Pressure Holding Time
Hold the test pressure typically for 10 minutes to 1 hour, depending on the code and piping size. Pressure must remain steady; any drop may indicate a leak.
Inspection During Testing
Welds, flanges, and valves are closely examined for signs of leakage or deformation. Visual inspection, and sometimes dye penetrant or ultrasonic testing, is used.
Post-Test Activities
Pressure Release and Draining
Slow depressurization is vital to avoid water hammer or damage. Once the pressure is safely released, the system is drained completely.
Drying and Flushing Procedures
Any residual water must be removed, especially in systems that will handle reactive fluids or gases. Compressed air, nitrogen, or vacuum drying may be employed.
Reinstatement and Final Inspection
All test blinds and temporary fittings are removed. The system is reinstated to its operational configuration and re-inspected before commissioning.
Common Issues and Troubleshooting
Leakage and Joint Failures
Leaks often occur at flanges or weak welds. These must be repaired and the test repeated, often with stricter monitoring.
Pressure Drop Without Visible Leaks
If pressure drops but no external leak is seen, trapped air, temperature variation, or hidden internal leaks may be the cause.
Causes of Test Failure and Mitigation
Incorrect gauge readings, poor cleaning, or improper pressurization steps can cause failure. Preventive planning and trained personnel are key.
Documentation and Recordkeeping
Essential Records and Certificates
Documentation includes:
Test pressure, medium, and duration
Calibration certificates
Visual inspection reports
Witness signatures (e.g., QA/QC, third-party)
Reporting to Authorities and Clients
Final reports are often submitted to clients or regulatory agencies as part of turnover packages or compliance filings.
Advantages and Limitations of Hydrostatic Testing
Benefits for Piping Integrity Assurance
Simple, effective, and widely accepted
High safety margin due to incompressibility of water
Detects most fabrication-related flaws
Limitations Compared to Pneumatic Testing
Requires drying after testing
Not suitable where water contamination is unacceptable
Slower and heavier setup than pneumatic testing
FAQs
What is the difference between hydrostatic and pneumatic testing?
Hydrostatic testing uses water, while pneumatic testing uses air or gas. Hydrostatic is safer because water is incompressible and releases less energy in case of failure.
How long should the hydrostatic pressure be maintained?
Usually 10–60 minutes, depending on system size and code requirements. It must be long enough to confirm there’s no pressure drop or leakage.
Is it safe to perform hydrostatic testing indoors?
Yes, if proper drainage, barriers, and safety protocols are in place. However, indoor testing requires special attention to prevent flooding or equipment damage.
What happens if a weld leaks during the test?
The weld must be marked, depressurized, repaired according to code, and the test repeated to confirm successful repair.
Can hydrostatic testing damage the piping system?
If over-pressurized or if trapped air causes water hammer, yes. But when done correctly with calibrated equipment, damage is rare.
Conclusion
Hydrostatic testing of fabricated piping is a critical verification process that ensures a piping system is safe, leak-proof, and ready for operation. While seemingly simple, it involves a rigorous setup, adherence to standards, and thorough documentation. When performed correctly, it minimizes risks and validates all upstream fabrication processes—making it the final stamp of approval before commissioning.