Ten Signs You’re Welding Correctly
Welding involves a lot of variables: different techniques, different metals, and different positions, to name just a few. But despite all that variety, your goal with any welding project — even with any single weld — is a reliable, safe weld that functions correctly.
To a large degree, welding quality is judged on the intended service of the finished weld. If you’re making a weld located in a highly visible area, the quality of your weld depends at least partly on its appearance. Conversely, if you’re making a weld to fix a piece of farm machinery, chances are that that weld’s quality comes down to whether or not the welded piece is sturdy and secure and allows the machinery to function as it’s supposed to. (In that case, it doesn’t have to be beautiful to be considered a successful, quality weld.)
No matter what you’re shooting for on a welding project or particular weld, a number of signs can indicate that you’re doing it right. Read on to discover ten of these useful signs.

The Weld Is Distributed Equally between Parts
If you’re welding two pieces of metal together, the molten metal that joins the two pieces should be distributed evenly between them. You control the size of your welds with your speed of travel (how fast you make the weld), the type of metal you’re depositing, and the thickness of the pieces you’re working with. Different projects call for different weld sizes, but despite changes in size, you should always feel good about the project if the weld is distributed equally between the parts you’re joining.
Don’t over weld! Many people who are new to welding have a tendency to overdo it on their weld sizes. Resist the temptation to make monstrous welds because too much welding can cause the pieces you’re working on to become brittle.
The Slag or Shielding Material Doesn’t Stick to the Weld
You know you’re welding correctly when the waste materials don’t stick to your welds. For example, when you’re stick welding, you can tell that you have the welding machine set correctly and that the electrodes you’re using are dry when the slag cools off and starts to peel away easily from the work. You definitely want the residue to come off the welding area nice and easily because you have to remove it before making additional welding passes or prepping the weld to be painted.
When you’re mig welding, the residue from your shielding gases should be easy to remove. If it’s not, your machine is likely set at the wrong temperature.
TIG welding is the cleanest of all the processes, so you really shouldn’t have any waste materials on your TIG welds when you’re finished. If you do, you started with metals that weren’t as clean as they should’ve been. Be sure all your materials are clean and free of impurities before you start a new TIG (or any) welding project.
No Holes or Irregularities on the Weld Surface
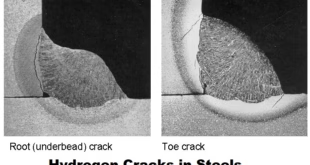
Holey weld, Batman! When you look at your welds, the last thing you want to see is porosity; a weld with holes is a weak weld, and it tells you that at some point along the way you ran into problems. Holes or other similar irregularities probably mean that you welded a dirty, oily, or wet base metal. It may also mean that you didn’t clean off the oxide coating on the base metal before you started welding. Or, if you’ve been tig or mig welding, porosity can be an indication that you weren’t using enough shielding gas. (That’s particularly problematic when you weld aluminum.)
The Weld Is Tight
If you’re tig welding or oxyfuel welding an autogenous weld — that is, the pieces you’re welding provide the source of the molten metal with no need for filler material — you can tell you’re doing a good job when the weld is nice and tight. A loose weld in that scenario usually means that you’re trying to weld two (or more) pieces that don’t fit together properly. A tight gap is less important in non-autogenous welds because you can use a filler rod to fill up ill-fitting joints.
When you’re making an autogenous weld, your finished product will be much higher quality if the pieces you plan to weld fit tightly together before you start welding. Larger gaps mean weaker finished welds because you don’t have enough filler to properly fill the joint.
The Weld Is Leakproof
After you start taking on more and more welding projects, it’s only a matter of time before you weld a metal container used to hold a liquid or a gas. I don’t know a whole lot of experienced welders who haven’t at one point or another made a weld to repair a 55-gallon steel drum, for example.
If you’re welding a drum, a tank, or any other kind of container meant to hold a liquid or a gas, a surefire way to recognize a successful weld is a leakproof surface. If the seam in the steel drum that you just welded is leaking water, you definitely didn’t get the weld right.
If you weld a container that will eventually be used to hold a pressurized gas, you can always do the soap-bubble test to check the integrity of the weld. After you finish the weld (close all the openings), add air pressure to create pressure inside the container. Then (after the weld cools), simply use a spray bottle to squirt a little soapy water onto the weld. If you see little bubbles in the soapy mixture, which means gas is escaping from the container, and you need to try your weld again.
The Weld Has Full Penetration
Penetration is the depth that the molten metal extends from the face of the base metals into the joint. Adequate penetration is completely critical in welding because if molten metal doesn’t penetrate deeply enough into the joint, the finished weld simply can’t be as strong as it would be if penetration was complete. For example, if you’re welding something that’s 1⁄8 inch thick and you get only 1⁄16 inch of penetration, you were able to get the molten metal down only halfway into the joint. That’s no good! Over time — and it may not take much time at all — that weld will fail. Any weld that doesn’t have the right amount of penetration is a ticking time bomb.
The Weld Has No Undercutting
You can tell that you’re doing a good job with your welds if they don’t contain any signs of undercutting, or a depression on the face of the weld below the surface of the base metal. You may also hear it referred to as underfill. This indicator is particularly relevant when you’re welding T joints, corner joints, or lap joints because if you don’t have a full joint, you get a very weak weld.
A number of contributing factors lead to undercutting, and any combination of them can cause the kind of undercutting that really compromises the integrity of your welds. One of the top causes of undercutting is excessive current. You may also get undercutting in your welds if you’re not manipulating the puddle correctly, or if you’re holding your electrodes at the wrong angle. Inappropriate supplies, such as the wrong filler rods or electrodes, can also cause undercutting.
The Weld Has No Overlap
If for some reason your weld metal isn’t melting the edges of the base metal joint and fusing with the base metal, you usually end up with overlap. Overlap occurs when the weld metal just piles up in the joint, and welds that suffer from overlap are weak at best.
Like undercutting (see the preceding section), overlap can be caused by a number of factors, including low welding current, improper electrode angle and manipulation, and unusually fast speed of travel. If you start to notice overlap in your welds, make sure your machine current is set correctly, consider the angle at which you’re holding your electrode, and remind yourself to take your time when you’re welding. These precautions can go a long way toward cutting out your overlap problems.
The Weld Meets Strength Requirements
Different welding projects have different goals that determine what constitutes a quality weld, you pretty rarely find a project where strength isn’t at least a minor consideration. If you don’t need a finished weld to be strong at all, why not just squirt some white glue in the joint, slap a couple strips of duct tape on it, or maybe just smash a couple pieces of chewing gum in there and hope for the best?
In all seriousness, you need to make sure your welds are strong enough to stand up to whatever forces may be applied to the joint or repaired surface. One of the best ways you can help ensure appropriate strength is to make sure that the filler rod or electrodes you use are rated at a higher strength level than the base metal you’re welding. For example, if you’re welding on a piece of 40,000-pound steel, use an electrode rated at 60,000 pounds. If you need to step up a little and weld on a piece of 60,000-pound steel, don’t continue to use that same electrode. Instead, bump up the strength rating of the electrode to 80,000 pounds and feel confident that you’re taking the first step toward ensuring your finished weld will be strong enough to get the job done.
You’re Safe and Healthy
What’s a surefire sign that you’re welding successfully? You’re healthy and in one piece when you’re finished. You may finish a welding project and end up with the most beautiful, perfectly executed weld in the history of the world. But that weld doesn’t mean bubkes if you burned yourself, threw out your back, or damaged your eyes in the process. I would much rather you fail miserably on every single weld you ever attempt than hurt yourself, and you should maintain that same approach every time you turn on your welding machine.
FAQs
What is autogenous welding?
Autogenous welding is a welding process where no filler material is used, and the molten metal for the weld is sourced from the base metals themselves.
How can I prevent overlap in my welds?
To avoid overlap, ensure that your welding machine is set at the correct current, maintain the right electrode angle, and take your time during welding.
Why is full penetration important in welding?
Full penetration ensures that the molten metal extends deep into the joint, making the weld strong and reliable.
What is undercutting in welding?
Undercutting is a depression on the face of the weld below the surface of the base metal, which weakens the weld.
Why is safety important in welding?
Safety is crucial in welding to protect the welder from injuries, burns, and other hazards associated with the process.
Conclusion
In conclusion, welding is a skilled trade that requires attention to detail and a deep understanding of the process. By paying close attention to these ten signs, you can ensure that your welding projects are successful and reliable. Always remember that safety should be your top priority.