Introduction
Welding is a critical process in metal fabrication, joining materials to create sturdy and reliable structures. However, like any manufacturing process, welding is not without its challenges. One of the persistent issues faced by welders is porosity. Understanding porosity in welding is crucial for ensuring the quality and integrity of the welded joints.
Definition of Porosity in Welding
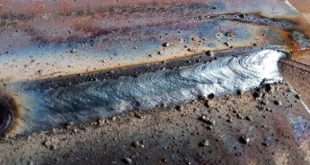
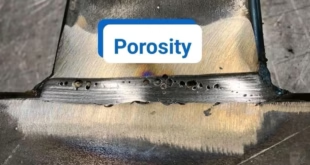
Porosity refers to the presence of small voids or cavities within a welded joint. These voids are typically filled with gas, and their existence can compromise the structural soundness of the weld. The gas trapped within these pores can vary and may include hydrogen, nitrogen, or other atmospheric contaminants. Porosity can manifest in different forms, such as surface pores or internal voids, and is often categorized based on the size and distribution of these cavities
Causes of Porosity
Porosity in welding can be attributed to various factors, each playing a distinct role in the formation of gas-filled voids within the weld. Understanding these causes is fundamental to implementing effective prevention and control measures.
Moisture and Contaminants
Moisture and contaminants are common culprits behind porosity in welding. The presence of atmospheric conditions, such as high humidity, can introduce moisture to the welding environment. When this moisture comes into contact with the molten metal, it vaporizes, releasing gases that get trapped within the weld. Additionally, contaminants present in welding materials, including base metals and filler metals, contribute to the formation of porosity.
Effect of Atmospheric Conditions
Atmospheric conditions can have a significant impact on the moisture content in the welding environment. High humidity levels can increase the likelihood of moisture being absorbed by the welding materials. As a result, welders must be vigilant about weather conditions, especially in outdoor welding settings, to minimize the risk of porosity.
Contaminants in Welding Materials
Contaminants such as rust, oil, paint, or other impurities on the surfaces of welding materials can introduce elements that lead to the formation of gas pockets. Proper cleaning and preparation of welding materials are crucial steps to mitigate the influence of contaminants on porosity.
Shielding Gas Issues
The shielding gas used in welding serves the critical function of protecting the molten weld pool from atmospheric gases. Issues related to shielding gas can contribute significantly to porosity in welded joints.
Inadequate Gas Flow
Insufficient shielding gas flow rates can result in an incomplete protection of the weld pool. This inadequacy allows atmospheric gases to penetrate the weld, leading to the formation of voids. Welders must carefully regulate and monitor gas flow to ensure optimal shielding throughout the welding process.
Contaminated Shielding Gas
The purity of the shielding gas is paramount to preventing porosity. Contaminated gases, whether from the welding gas source or introduced during the welding process, can introduce impurities that contribute to the formation of gas-filled voids. Regular testing and maintenance of gas sources are essential to prevent contamination.
Electrode and Filler Material
The type and quality of the electrode and filler materials used in welding play a crucial role in porosity prevention.
Quality of Electrode
The electrode quality directly impacts the stability of the arc and the transfer of filler metal. Using low-quality electrodes can lead to erratic arc behavior, inconsistent fusion, and increased chances of porosity. Employing high-quality electrodes helps maintain a stable arc and reduces the risk of gas entrapment.
Filler Metal Composition
The composition of the filler metal must be compatible with the base metal and meet specific welding requirements. Mismatched or impure filler metals can introduce elements that contribute to porosity. Welders should carefully select filler metals based on the welding application and adhere to recommended compositions and classifications.
Types of Porosity
Porosity in welding manifests in different forms, each with its unique characteristics and implications for the quality and integrity of the welded joint. Understanding these types is crucial for accurate detection, assessment, and mitigation of porosity-related issues.
Surface Porosity
Surface porosity, as the name suggests, occurs on the external surfaces of the welded joint. These are visible voids that can often be detected through visual inspection. Surface porosity is a concern not only for aesthetic reasons but also because it can act as potential initiation points for corrosion. The formation of surface porosity is often linked to factors such as inadequate shielding gas coverage, contamination on the material surface, or improper welding techniques.
Surface porosity is a common focus during visual inspections, and its prevention involves meticulous surface preparation, thorough cleaning of welding materials, and ensuring proper shielding gas coverage during the welding process. By addressing these factors, welders can minimize the occurrence of surface porosity and enhance the overall appearance and durability of the weld.
Internal Porosity
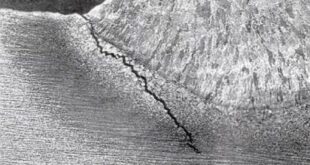
Internal porosity refers to the presence of gas-filled voids within the body of the welded joint, beneath the external surface. Unlike surface porosity, internal porosity is not readily visible and often requires more advanced inspection techniques, such as non-destructive testing (NDT), for detection. Internal porosity poses a more significant risk to the structural integrity of the weld, as it can compromise the material’s strength and resistance to applied loads.
Factors contributing to internal porosity include gas entrapment during the solidification of the molten weld pool, insufficient shielding, or the use of contaminated welding materials. Prevention strategies involve optimizing welding parameters, ensuring proper shielding gas flow, and maintaining the cleanliness of welding materials.
Detecting and addressing internal porosity early in the welding process is critical to avoiding potential structural failures. Non-destructive testing methods, such as radiographic or ultrasonic testing, can provide insights into the internal structure of the weld and help identify any hidden porosity.
Pore Size and Distribution
Porosity is not a uniform defect; it varies in terms of pore size and distribution within the welded joint. Understanding the size and distribution of pores is essential for evaluating the severity of porosity and determining its potential impact on the weld’s performance.
- Pore Size: The size of individual pores can range from microscopic to visible to the naked eye. Smaller pores may not pose as significant a risk as larger ones, but their cumulative effect can still compromise the weld’s integrity.
- Pore Distribution: The distribution pattern of pores within the weld also influences the overall impact on the joint. Uniformly distributed pores may indicate systemic issues in the welding process, while clustered or localized porosity could be linked to specific factors such as material contamination or shielding gas interruptions.
Detection and Inspection
Detecting and inspecting porosity in welding is a critical step in ensuring the quality and reliability of welded joints. Various methods, ranging from visual inspections to advanced non-destructive testing (NDT) techniques, are employed to identify and assess porosity.
Visual Inspection
Visual inspection is the most straightforward and commonly used method for detecting porosity, especially surface porosity.
- Surface Examination: Visual inspection involves a careful examination of the external surfaces of the welded joint. Welders and inspectors look for visible signs of surface porosity, such as small holes or irregularities on the weld surface. This method is quick and cost-effective, making it a routine part of quality control processes. However, it may not detect internal porosity that is not visible on the surface.
- Penetrant Testing: Penetrant testing, also known as dye penetrant testing, is a method that can be used to detect both surface and near-surface defects, including porosity. A liquid dye penetrant is applied to the weld surface, and after a specified time, excess penetrant is removed. A developer is then applied to draw the penetrant out of any surface defects, making them visible under ultraviolet or visible light. This method is particularly effective for identifying small surface cracks and porosity.
Non-Destructive Testing (NDT)
Non-destructive testing techniques are more advanced and are capable of identifying internal porosity without compromising the integrity of the welded joint.
- Radiographic Testing: Radiographic testing, commonly known as X-ray testing or radiography, involves passing X-rays or gamma rays through the welded joint. The radiation creates an image on a film or digital detector, allowing inspectors to visualize internal structures, including porosity. Radiographic testing is highly effective for detecting internal defects but requires specialized equipment and trained personnel.
- Ultrasonic Testing: Ultrasonic testing utilizes high-frequency sound waves to inspect the internal structure of a weld. A transducer sends ultrasonic waves into the material, and the reflections of these waves are analyzed to identify anomalies, such as porosity. This method is sensitive to changes in material properties and is commonly used for detecting internal defects in various weld configurations.
- Magnetic Particle Testing: Magnetic particle testing is suitable for detecting surface and near-surface defects, including porosity. It involves applying a magnetic field to the welded joint and then applying ferrous particles (usually iron filings or magnetic ink). These particles accumulate at the locations of defects, creating visible indications that can be inspected. Magnetic particle testing is often used in conjunction with other methods for comprehensive defect detection.
Prevention and Control Measures
Preventing and controlling porosity in welding involves a combination of adopting proper welding techniques, managing shielding gases effectively, and ensuring meticulous material preparation. Implementing these measures is essential for maintaining the structural integrity and quality of welded joints.
Proper Welding Techniques
- Controlled Welding Parameters: One of the fundamental aspects of preventing porosity is the careful control of welding parameters. Variables such as voltage, current, travel speed, and arc length significantly impact the welding process. By adhering to recommended parameters and adjusting them based on material thickness and type, welders can optimize the weld pool and minimize the chances of gas entrapment. Consistent control of welding parameters is crucial for achieving high-quality, porosity-free welds.
- Welding Speed and Heat Input: Welding speed and heat input are directly linked to the formation of porosity. Rapid welding speeds or excessive heat input can lead to inadequate gas shielding, incomplete fusion, and increased chances of porosity. Maintaining an appropriate balance between welding speed and heat input, based on the material being welded, helps create a stable weld pool with sufficient shielding, reducing the likelihood of gas entrapment.
Adequate Shielding Gas Management
- Gas Flow Rates: Proper shielding gas flow rates are critical for preventing porosity. Inadequate gas flow can result in insufficient coverage of the weld pool, allowing atmospheric gases to penetrate and cause porosity. Welders must carefully set and monitor gas flow rates based on the welding process and materials used. Regular checks and adjustments during welding ensure consistent and effective shielding throughout the entire welding operation.
- Gas Purity: The purity of the shielding gas is equally important in preventing porosity. Contaminated gases introduce impurities that can contribute to gas entrapment and void formation. Welders should source high-quality, pure gases and regularly check gas cylinders for contamination. Gas cylinders should be properly stored and maintained to prevent the introduction of impurities during the welding process.
Material Preparation
- Surface Cleaning: Thorough cleaning of welding materials is crucial for preventing surface porosity. Contaminants such as rust, oil, paint, or residue on the material surface can introduce impurities into the weld pool, leading to gas entrapment. Proper pre-weld cleaning, using methods such as wire brushing, grinding, or solvent cleaning, ensures a clean welding surface, reducing the risk of porosity.
- Material Storage and Handling: How materials are stored and handled before welding can impact the likelihood of porosity. Materials should be stored in a clean, dry environment to prevent moisture absorption. Additionally, proper handling practices, such as avoiding direct contact with hands or tools that may introduce contaminants, contribute to maintaining material cleanliness. When stored materials are prepared and handled with care, the risk of porosity is significantly reduced.
Case Studies
Learning from real-world examples of welding failures due to porosity provides valuable insights into the consequences of inadequate practices. Examining these case studies allows industry professionals to understand the root causes, effects, and, most importantly, the lessons learned to implement best practices in future welding projects.
Examples of Welding Failures Due to Porosity
- Underwater Pipeline Welding Failure: In a case involving the welding of an underwater pipeline, porosity-induced failure occurred due to inadequate shielding gas management. The welding process lacked proper gas flow rates, leading to incomplete shielding and the formation of internal porosity. Over time, the accumulated porosity weakened the weld, resulting in leaks and ultimately the failure of the pipeline. This case underscored the critical role of effective gas management in underwater welding projects.
- Aircraft Component Failure: A case study involving the failure of a critical aircraft component highlighted the impact of surface porosity on structural integrity. The porosity, attributed to insufficient surface cleaning and contamination of the welding material, compromised the component’s strength. The failure occurred during routine stress tests, emphasizing the need for meticulous material preparation to eliminate surface contaminants and prevent porosity-related failures in aerospace applications.
Lessons Learned and Best Practices
- Rigorous Pre-Weld Cleaning Procedures: Both case studies emphasize the importance of rigorous pre-weld cleaning procedures to prevent surface contaminants. Implementing thorough cleaning practices, such as abrasive cleaning, solvent cleaning, or other appropriate methods, ensures a clean welding surface, reducing the risk of porosity-related failures.
- Precise Shielding Gas Management: In the underwater pipeline case, inadequate shielding gas management was a significant contributor to porosity. The lesson learned is the critical importance of precise control over shielding gas flow rates. Welders must carefully regulate gas flow to provide consistent and effective coverage, especially in challenging environments like underwater welding.
- Continuous Monitoring and Inspection: Both case studies highlight the necessity of continuous monitoring and inspection throughout the welding process. Regular checks of welding parameters, gas flow rates, and visual inspections can help detect and address potential issues before they lead to failures. Incorporating non-destructive testing methods, such as radiographic or ultrasonic testing, further ensures the integrity of the welded joints.
- Training and Certification: The cases underscore the need for well-trained and certified welders. Ensuring that welders are knowledgeable about proper welding techniques, material preparation, and gas management is crucial for preventing porosity-related failures. Ongoing training programs and certifications help welders stay updated on the latest industry standards and best practices.
- Documentation and Traceability: Both case studies highlight the importance of documentation and traceability in welding projects. Proper documentation of welding procedures, materials used, and quality control measures allows for traceability and facilitates post-failure analysis. This documentation becomes invaluable for identifying root causes and implementing corrective actions.
FAQs
What is the main cause of porosity in welding?
Porosity in welding is often caused by inadequate shielding gas, contaminated base metal, incorrect welding parameters, and electrode moisture.
How can I prevent porosity in my welds?
To prevent porosity, ensure a steady flow of shielding gas, thoroughly clean the base metal, adjust welding parameters accurately, and store electrodes in a dry environment.
Can porosity be repaired once it occurs?
In some cases, porosity can be repaired by re-welding the affected area after addressing the root cause. However, prevention is key to maintaining weld integrity.
Are there specific welding techniques to minimize porosity?
Using proper welding techniques, such as backstepping and controlling heat input, can minimize the risk of porosity. Experimenting with techniques is essential to finding what works best for your specific application.
Is porosity more common in certain welding processes?
Certain welding processes, like MIG welding, may be more susceptible to porosity. However, with proper techniques and precautions, porosity can be minimized across various welding methods.
Can porosity lead to weld failure?
Yes, porosity can compromise the structural integrity of welds, potentially leading to weld failure, reduced load-bearing capacity, and increased susceptibility to corrosion.
What causes gas pores in welding?
Gas pores in welding are primarily caused by the entrapment of gases like hydrogen and nitrogen during the welding process.
Can porosity be completely eliminated?
While complete elimination is challenging, diligent adherence to proper welding practices and preventive measures can significantly reduce porosity.
How does porosity affect weld strength?
Porosity compromises weld strength by creating voids, reducing the material’s overall structural integrity.
Are there preventive measures for solidification pores?
Preventive measures for solidification pores include controlling cooling rates and using proper welding techniques to minimize their occurrence.
What advancements are being made in porosity detection?
Advancements in porosity detection include the use of advanced non-destructive testing methods like ultrasonic testing and radiography.
Conclusion
Welding is a fundamental process in various industries, and the control of porosity remains a crucial aspect to ensure the strength, integrity, and longevity of welded joints. In this conclusion, we summarize key points, emphasize the importance of porosity control, and encourage a commitment to ongoing learning and improvement in welding practices.
 Welding of Welders All about Welding and Welders


